
|
In the world of graphic design, photo clipping is a fundamental skill that can transform the way you create and manipulate images. It involves the process of isolating a portion of an image, effectively 'clipping' it out, to use in various applications such as marketing materials, website graphics, or product catalogs. Mastering the art of photo clipping can elevate your design work and open up a myriad of creative possibilities. Here are some tips on how to make the most of your path when clipping photos. Understanding Clipping PathsA clipping path is a vector graphic that outlines the desired portion of an image. It acts as a precise boundary, allowing designers to separate an object from its background or the rest of the image. This is particularly useful when dealing with product photography or any image where a clean, professional look is paramount. The Importance of PrecisionPrecision is key when creating a clipping path. The quality of the final product depends on the accuracy of the path, so it's essential to zoom in and carefully trace the edges of the object. Tools like the Pen tool in Adobe Photoshop are commonly used for their control and precision when creating paths. Techniques for Effective Photo ClippingUtilizing the Right ToolsVarious software applications offer different tools for photo clipping. The Pen tool is widely favored for its control, but some designers also use the Magic Wand or Lasso tool for quicker, albeit less precise, selections. Choose the tool that works best for the complexity of the image and the level of detail required. Handling Complex EdgesObjects with fur, hair, or transparent elements pose a challenge in photo clipping. In such cases, advanced techniques like channel masking can be employed. This method involves using the contrast between the object and background to create a more nuanced selection, preserving fine details that a standard path might miss. Post-Clipping ConsiderationsRefining EdgesAfter creating your clipping path, it's important to refine the edges to ensure they look natural and blend seamlessly with the new background. This may involve feathering the edges or using other edge refinement tools to smooth out any harsh lines. Consistency Across ImagesIf you're clipping multiple images for a project, maintaining consistency is crucial. Ensure that the lighting, perspective, and shadowing remain uniform across all clipped images to create a cohesive final product. Applications of Photo ClippingClipping photos isn't just about isolating objects; it's also about creating images that are versatile and ready for multiple uses. From e-commerce to print ads, a well-clipped image can enhance the visual appeal and effectiveness of your designs. ConclusionThe art of photo clipping is more than just a technical skill; it's a crucial aspect of graphic design that can greatly impact the visual quality of your work. By focusing on precision, utilizing the right tools, and paying attention to post-clipping details, you can make the most of your path and produce professional, eye-catching images. Whether you're a novice designer or a seasoned pro, refining your photo clipping techniques can be a game-changer for your projects. So, grab your digital scissors, and let's start clipping! 
0 Comments
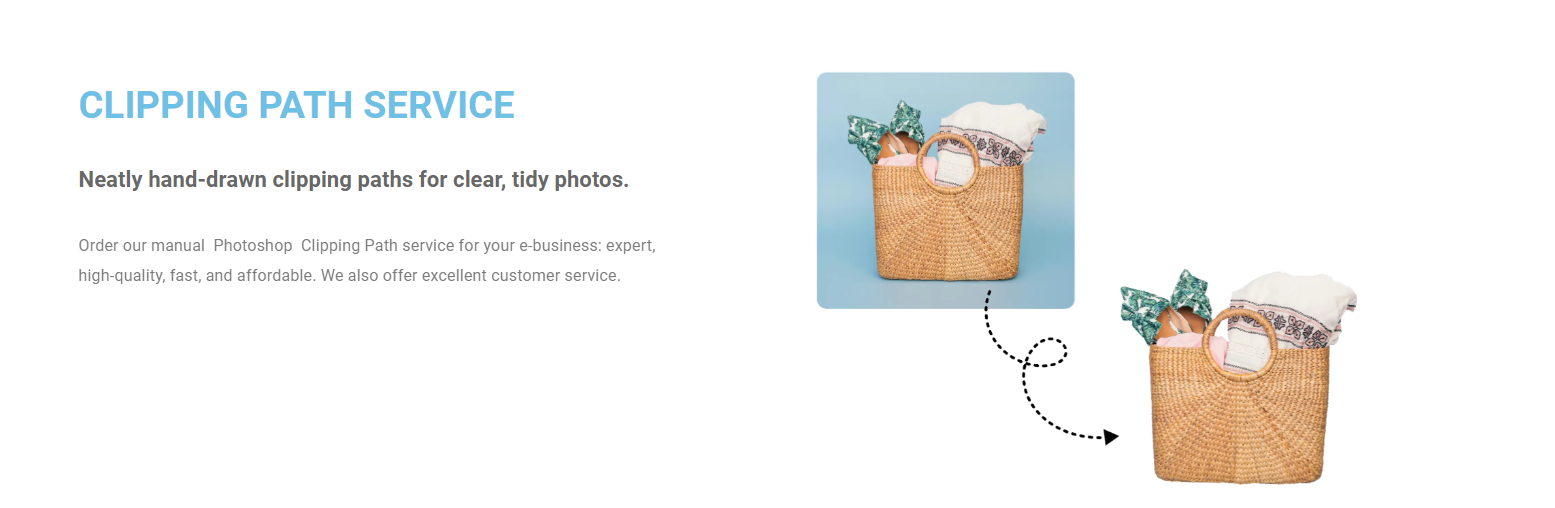 In the competitive world of e-commerce, first impressions are everything. High-quality product images are crucial for grabbing attention, conveying professionalism, and ultimately driving sales. This is where clipping path services come in. What is a Clipping Path?A clipping path is a precise digital outline created around a product in an image. This allows for the removal of the background, leaving a clean, isolated image of the product itself. This can be replaced with a white background for a classic look, or a more creative background to suit your brand. Why is Clipping Path Important for E-Commerce?There are several key reasons why clipping path services are essential for any e-commerce business:
Investing in QualityClipping paths are not all created equal. When choosing a clipping path service provider, look for one that offers high-quality results, attention to detail, and fast turnaround times. A reputable service will ensure your product images are pixel-perfect and consistent with your brand guidelines.
By incorporating clipping path services into your e-commerce strategy, you can elevate your product presentation, improve customer experience, and ultimately drive sales. In today’s digital marketplace, high-quality product images are no longer an option – they’re a necessity. 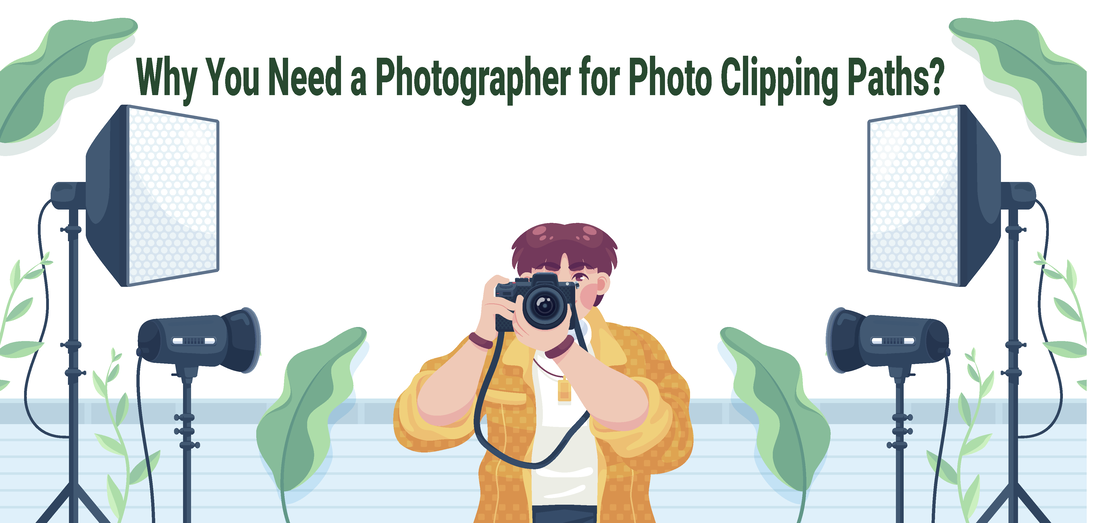 In the age of e-commerce and digital marketing, high-quality product images are crucial for success. But simply taking a picture isn't enough. To truly make your products shine, you often need to remove the background using a technique called a clipping path.
While anyone can technically learn how to use photo editing software to create Photo clipping path, there are significant advantages to working with a professional photographer who offers this service. Here's why: 1. Capturing Flawless Photos: A good clipping path starts with a great photo. Photographers understand lighting, composition, and how to capture product details effectively. This ensures the final image, after the background is removed, will be clear, crisp, and free of shadows or imperfections that can complicate the clipping process. 2. Expertise in Clipping Paths: Creating a precise clipping path takes skill and experience. Photographers who specialize in this service know how to create clean, accurate selections around complex objects, even with soft edges or hair-like details. This ensures a professional, polished look for your final product images. 3. Consistency and Efficiency: If you're dealing with a high volume of product images, a photographer can streamline the process. They can create consistent clipping paths for all your products, saving you time and effort. 4. Advanced Techniques: Photographers may use specialized software or techniques beyond basic clipping paths. This can include creating drop shadows or reflections to add depth and realism to your product images. 5. Creative Collaboration:Photographers can work with you to achieve the specific look you desire for your product images. Whether you need a clean white background or a more creative setting, they can help you brainstorm and execute the perfect visual representation. In Conclusion While there are situations where a simple do-it-yourself approach might work, for professional-looking product images that convert, partnering with a photographer who offers clipping path services is a wise investment. Their expertise in photography and post-processing will ensure your products are presented in the best possible light, ultimately boosting your brand and sales.  In the ever-expanding realm of e-commerce, where visual appeal reigns supreme, the importance of high-quality product images cannot be overstated. In a digital landscape saturated with countless options, Photo Clipping Path services emerge as indispensable tools for businesses striving to stand out. Let us delve into the intricacies of this essential service and explore how it can revolutionize your online presence.
Understanding the Essence of Photo Clipping Path Photo Clipping Path is a technique used to isolate specific portions of an image, effectively removing unwanted elements while retaining the desired subject. This meticulous process involves outlining the target object with precision, creating a clean and defined silhouette. Whether it's removing backgrounds, enhancing product features, or creating custom visual compositions, Photo Clipping Path empowers e-commerce businesses to showcase their products in the best possible light. Elevating Visual Aesthetics In the fiercely competitive e-commerce landscape, captivating imagery is the gateway to customer engagement. Photo Clipping Path services enable businesses to transcend mediocrity and present their products with unparalleled visual appeal. By eliminating distractions and enhancing focal points, businesses can captivate their audience's attention instantaneously. Every pixel becomes an opportunity to entice and convert potential customers, fostering trust and bolstering brand credibility. Streamlining Product Presentation The presentation of products plays a pivotal role in influencing purchasing decisions. With Photo Clipping Path services, e-commerce businesses can streamline product presentation to perfection. Gone are the days of cluttered backgrounds and distracting elements detracting from the main attraction. By seamlessly integrating products into immaculate settings or presenting them against neutral backgrounds, businesses can accentuate their unique selling points and foster a sense of desire in the minds of consumers. Enhancing Brand Consistency Consistency is key to building a strong and recognizable brand identity. Photo Clipping Path services ensure uniformity across product images, reinforcing brand aesthetics and values. Whether it's maintaining consistent backgrounds, lighting, or image proportions, businesses can instill confidence in consumers and cultivate brand loyalty. Each interaction becomes an opportunity to reinforce brand identity and leave a lasting impression on potential customers. Optimizing SEO Performance In the digital realm, visibility is synonymous with success. Photo Clipping Path services not only enhance visual appeal but also contribute to improved SEO performance. By optimizing product images with clean backgrounds and relevant alt text, businesses can enhance their search engine rankings and attract organic traffic. As search algorithms increasingly prioritize visual content, leveraging Photo Clipping Path services becomes imperative for staying ahead of the competition and dominating search results. Conclusion Inthe dynamic world of e-commerce, where first impressions are paramount, Photo Clipping Path services emerge as a game-changer. From elevating visual aesthetics to optimizing SEO performance, the benefits are manifold. By investing in Photo Clipping Path services, e-commerce businesses can unlock new realms of success and establish themselves as industry leaders. 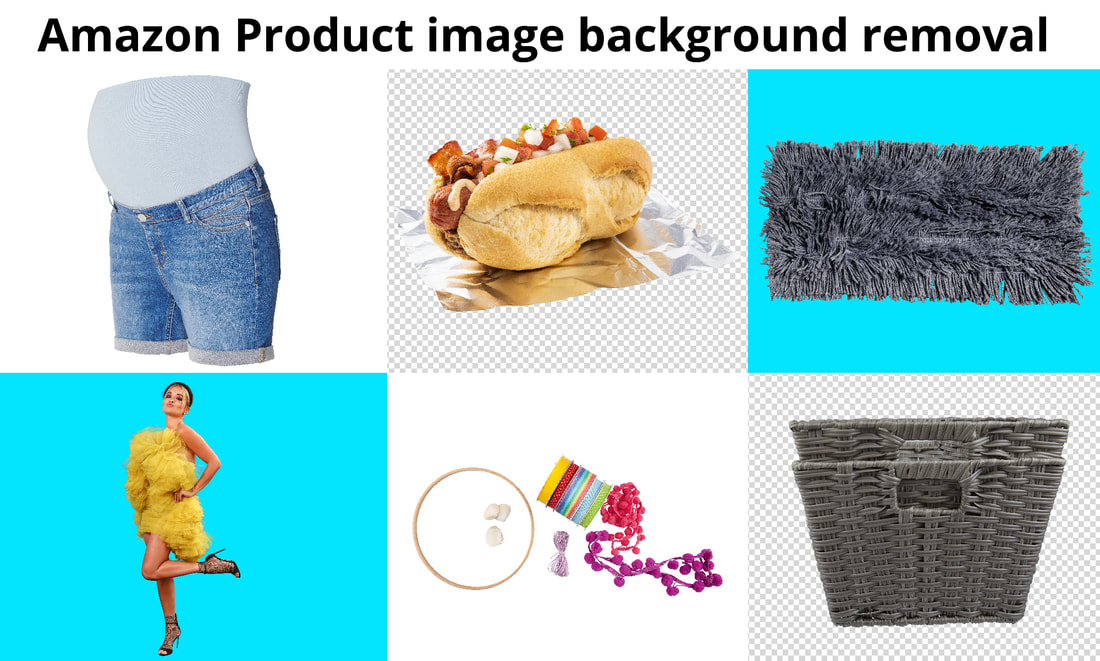 About this gigAre looking for a Professional Amazon Product image background removal service provider? You are in the perfect place here. My name is Toufik Hasan (Director and Expert Image Editor in Photo Clipping Path BD), I am a Professional Amazon Product image background removal service provider, My services include:
Why choose me for your background removal service?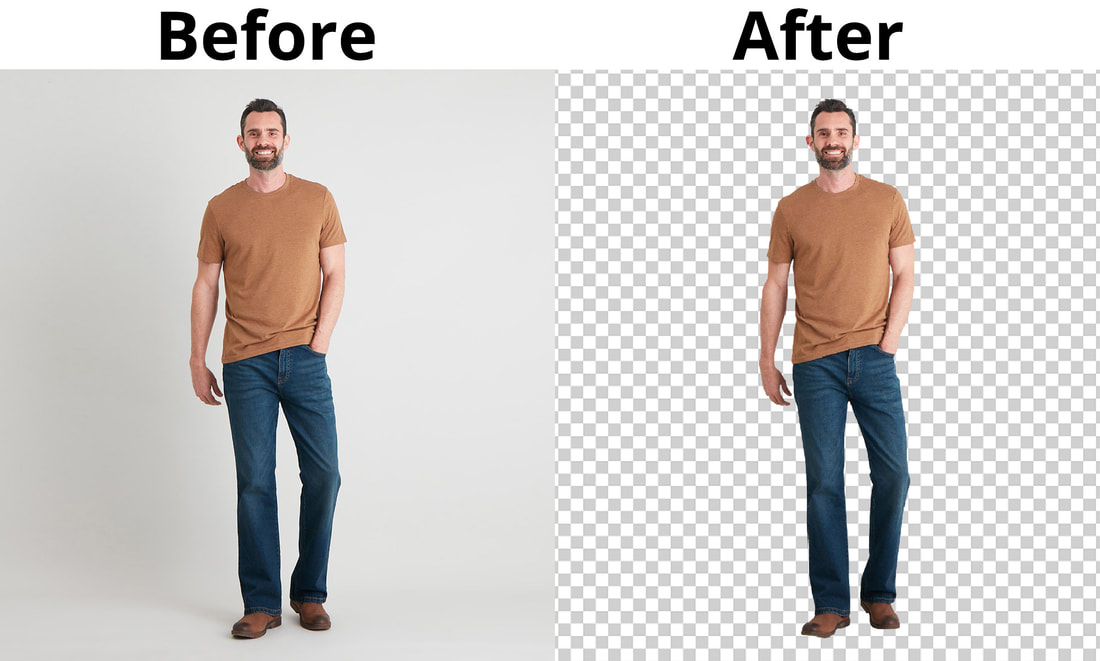
Price Packages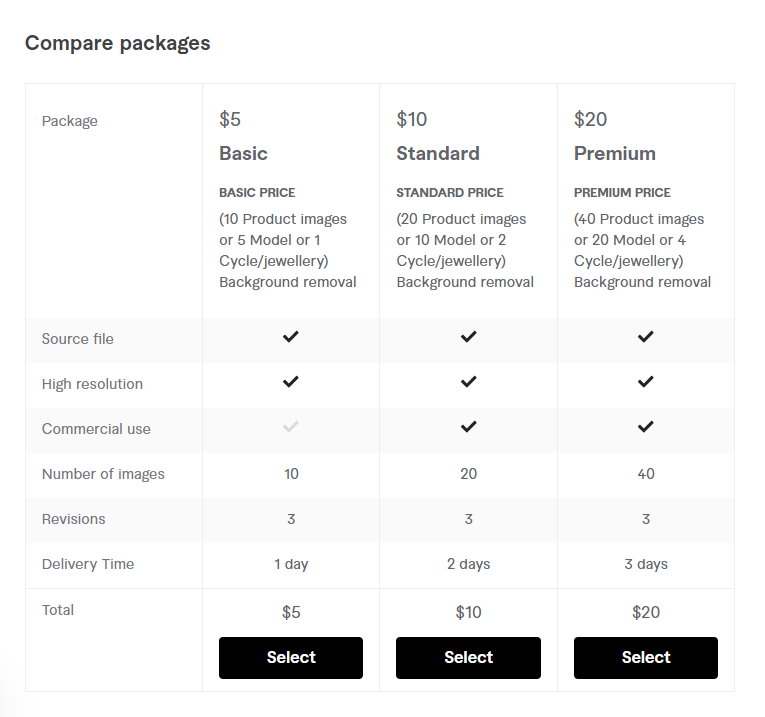 ** Thank you for reading my article.**
** If you need background removal service please Try us for free ** 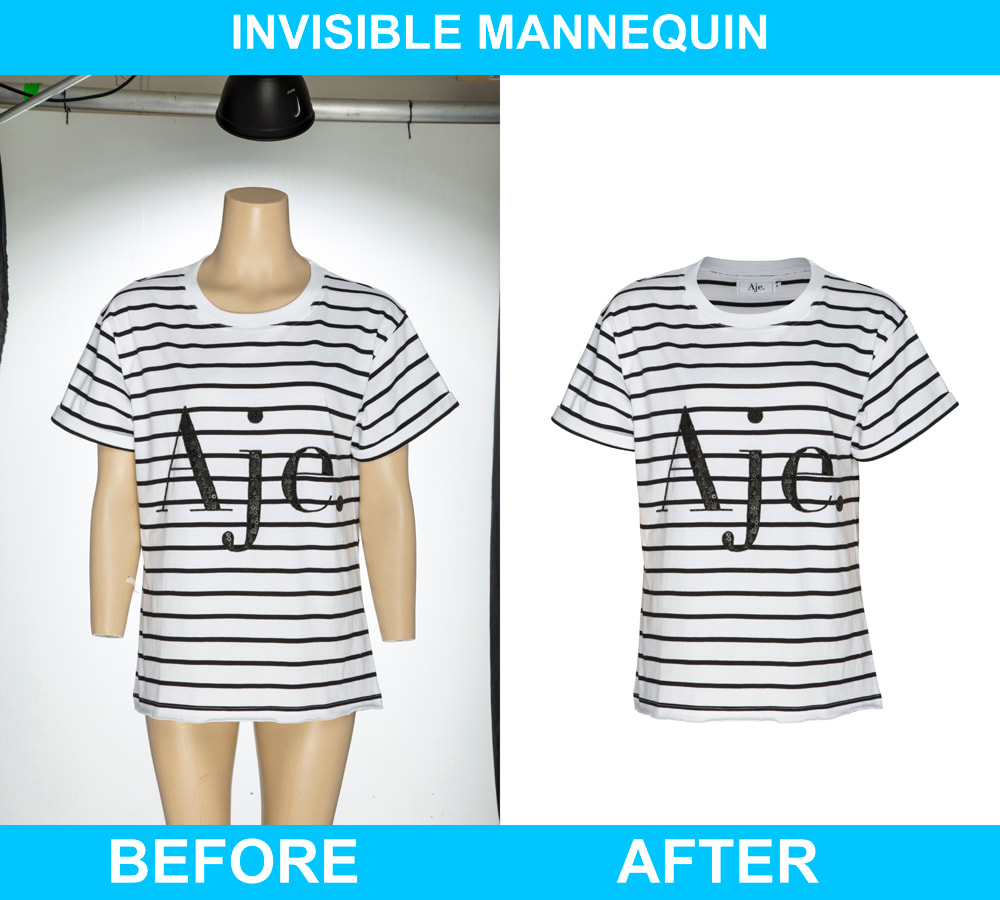 Concluding our stage setup, here comes our mannequin photo editing part. If you have to edit your clothing product by yourself, here is the step-by-step process to do it in Adobe Photoshop. Step 1 : Open the image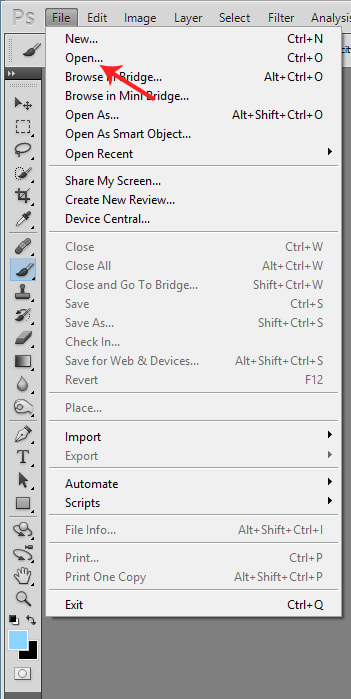 Step 2: Create Clipping PathNow create a clipping path by using the Pen Tool. Pick the tool from the toolbar. Press ‘Ctrl & +’ on your keyboard at a time to Zoom the image. Zoom in as much as you need so that you can see the edges clearly. Then create a clipping path around the dress by creating anchor points.  Leaving the unwanted parts, draw a line covering the whole dress. Start from the top of the mannequin’s collar. While creating anchor points, be careful about the edges so that no part of your product is erased. Step 3 : Remove BackgroundRight-click on the mouse and a box will pop-up. Click on ‘Make Selection’ from the menu. 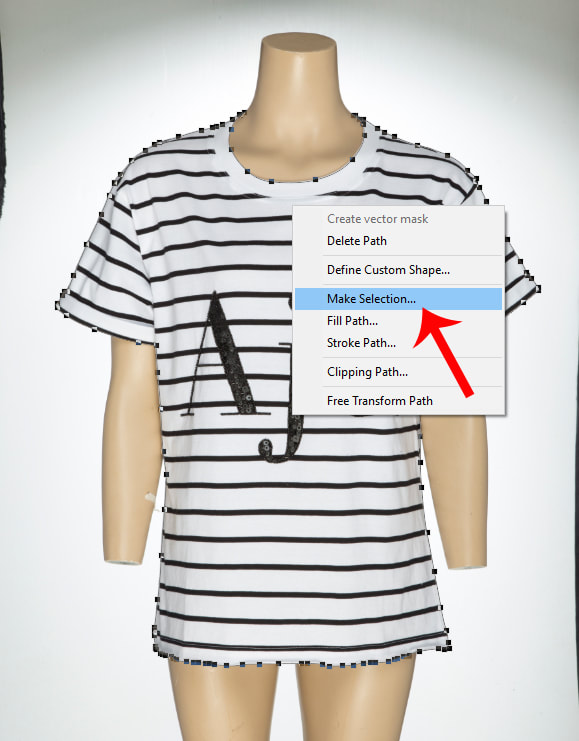 Now, go to the Layer Panel and there is a square box below, with a circle inside. Click on that button to add a layer mask. This will remove the background. Then, right-click on the mask and click on ‘Apply Mask’. 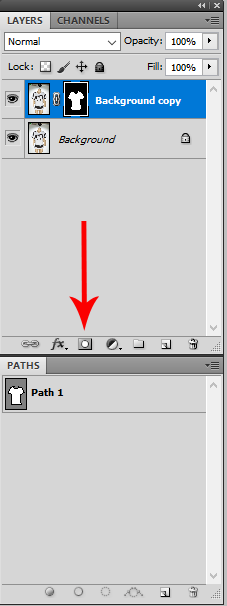 Turn off the Background layer by clicking on the eye beside Background Layer. 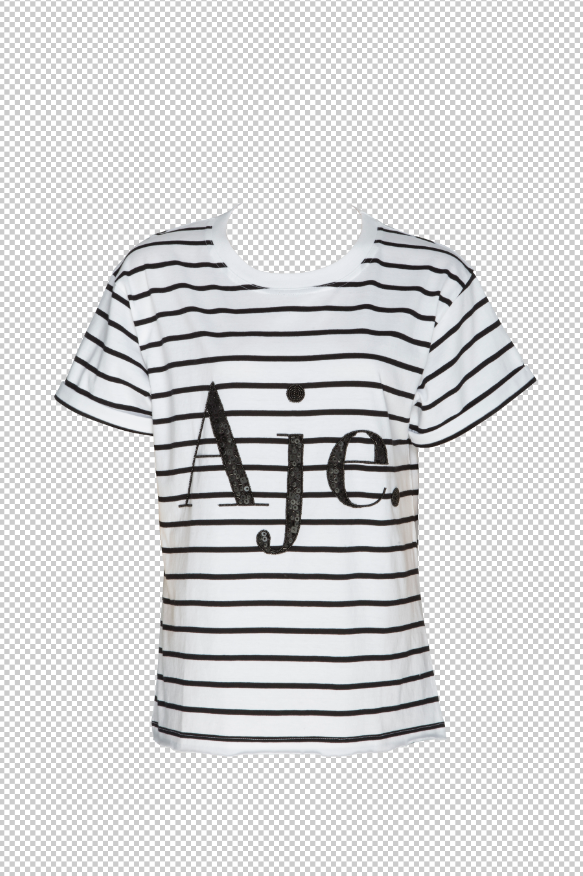 Step 4 : Cut the collar imageGo to File and then click on Open to open the inside back image of the T-shirt. Now, take the crop tool from the toolbar and draw a box around the collar to crop the collar area with the label, and then press Enter. 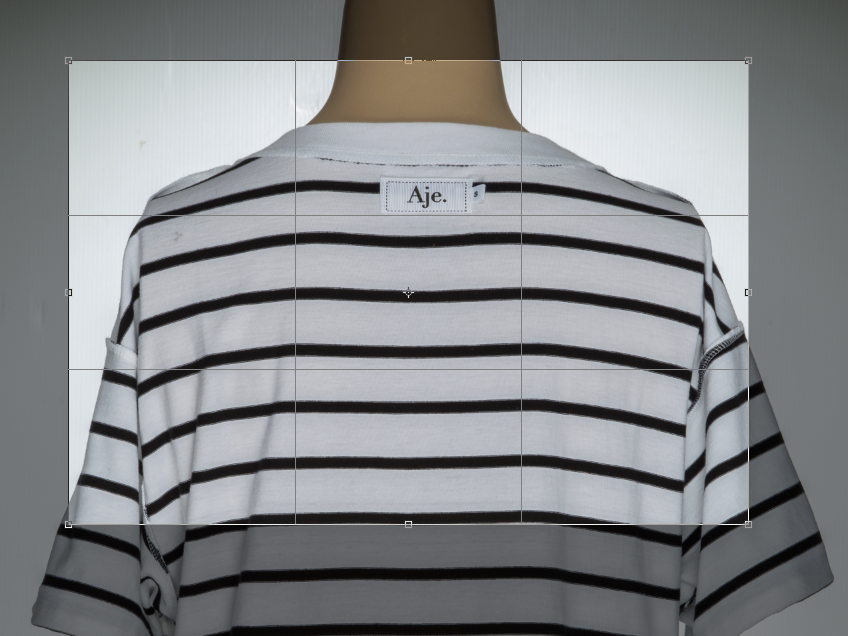 Step 5 : Place the CollarClick on the collar image Layer, hold and drag the Layer and place it on the main image. Move the collar’s image underneath the first layer of the front. 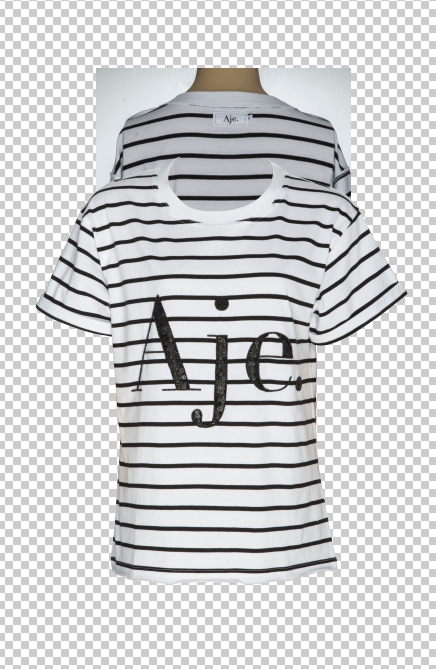 To adjust the collar position, click on Edit from the top menu and click on Free Transformation, or you can just press Ctrl+T. This will allow you to move the collar wherever you need it. Now, set the collar position. 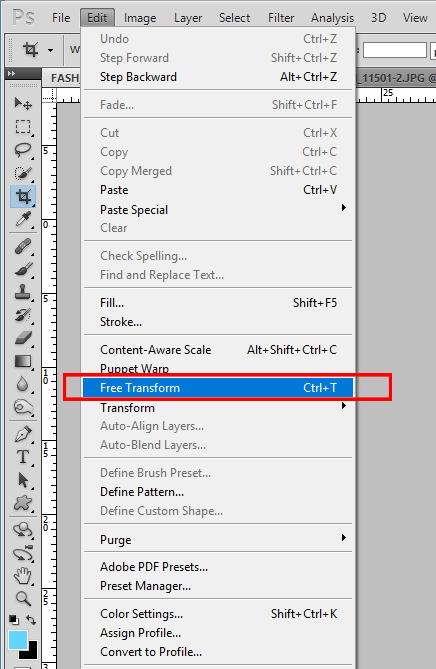 You might need to set the angle too. For that, right-click on your mouse and select Warp option, and set the angle with the main image. Make sure you’re working on Free Transform, otherwise Warp won’t work. 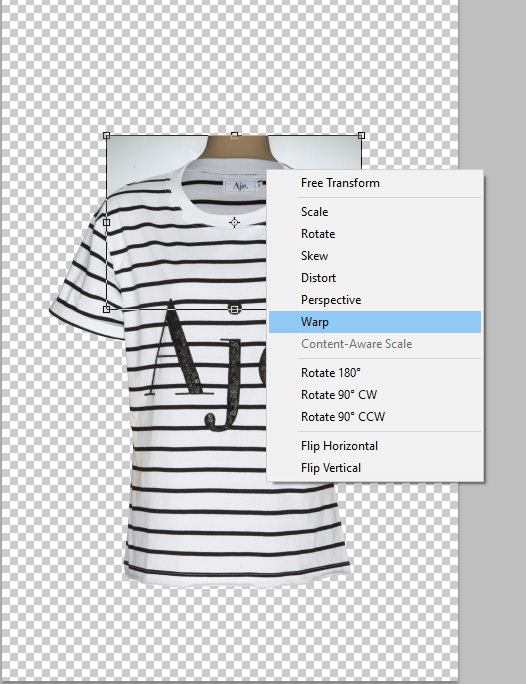 Step 6 : Create ShadowSelect the Brush Tool from the toolbar. Set the opacity according to your need, which can be around 35% and 40%. Make sure your foreground color is selected as black. 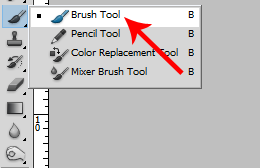 Now, start to brush the area under the collar to add shadow to the image.  Step 9 : Delete Anchor PointsClick on the path you created before from the layer menu. 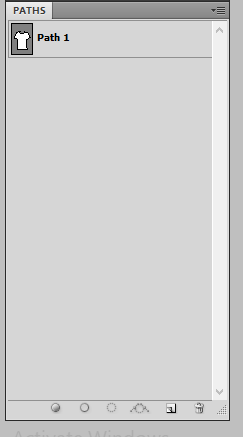 Pick the Pen tool from the toolbar. Now, draw a box around the collar area to select the anchor points you want to delete. Press ctrl on your keyboard and click on your mouse to select the anchor points. Click on delete on your keyboard to delete the anchor points around the collar. 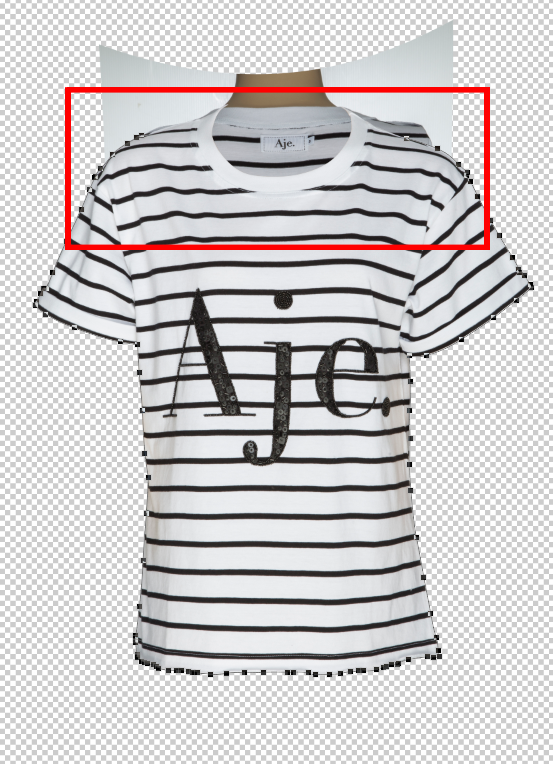 Step 8 : Create New PathNow, add new anchor points, including the collar, and create a path.  Step 9 : Delete unwanted areaMake the selection path and click Ctrt+shift+I selection background area and delete Mask leyer and delete Collar 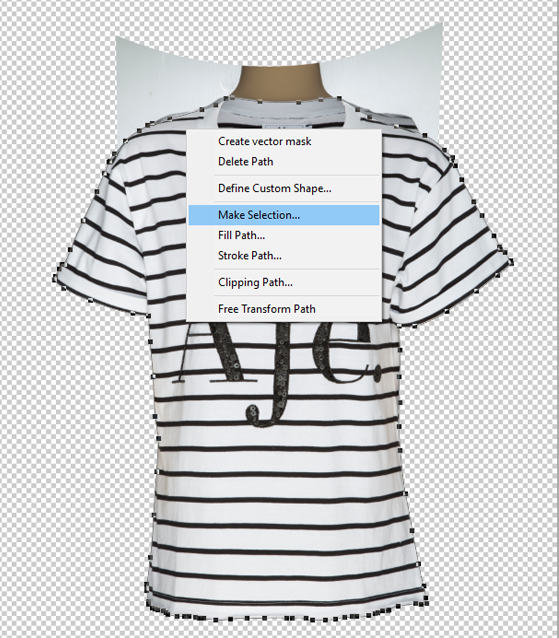 Step 10 : Change the background colorGo to Layer Menu and select the Background Layer. Now, click on the round box below the Layer menu. Click on the Solid Color and choose the color you want to put as the background color. If you see your product color has changed, just press ‘Ctrl + I’ on your keyboard. This will invert the color. 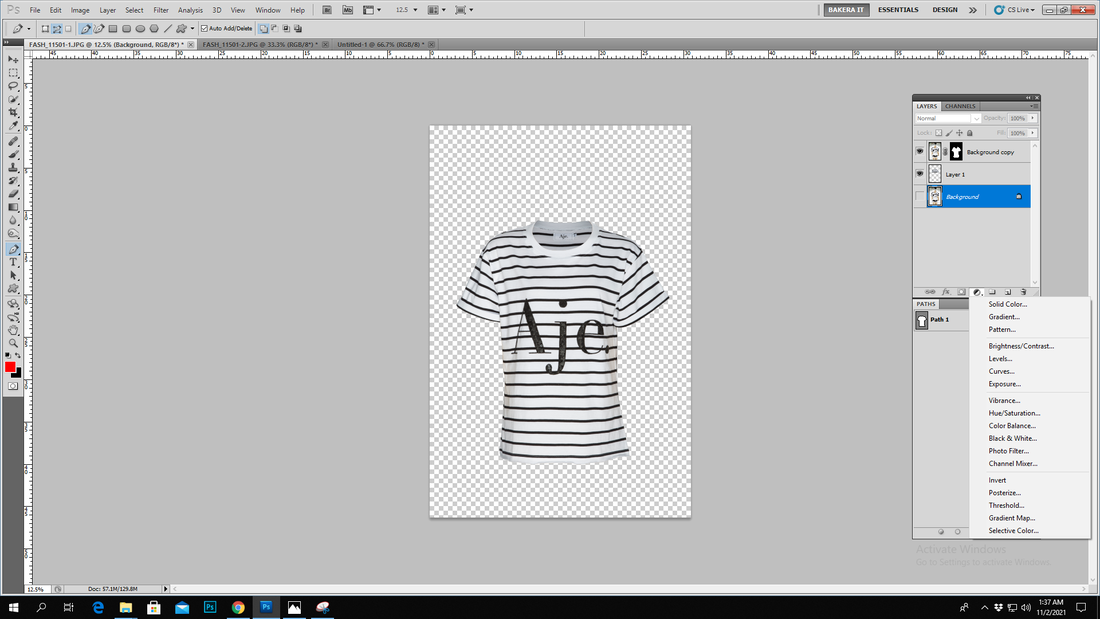 Step 11 : Save the fileWork is done then save your file  How to Outsource Post-processing Part?Bakera IT offers this service at a competitive price range. A team of experienced professionals is assigned to do this task particularly. Apart from the regular pricing, you will get a discount at bulk amount order. 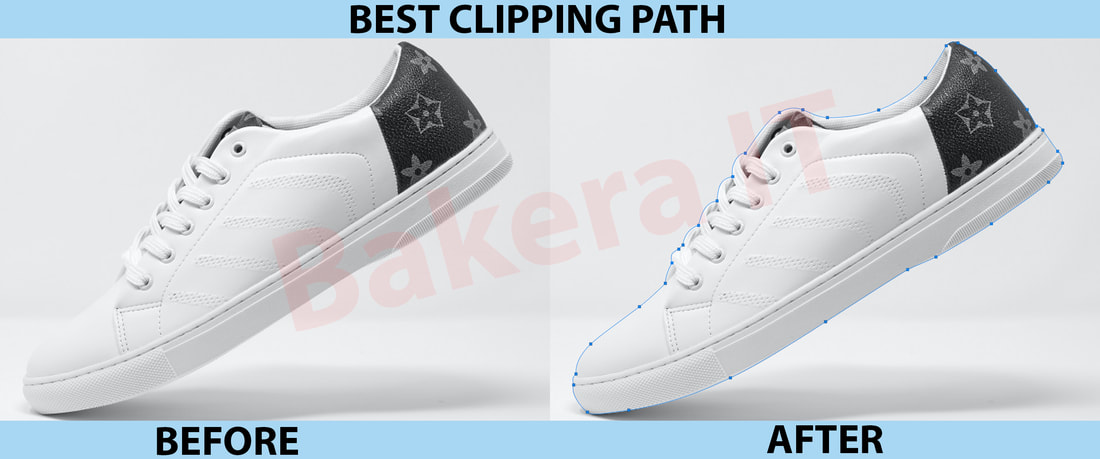 Clipping Path Clipping paths is the outline created to use the pen tool in the image editing software removing an image from it is background. In a general the involved parts of a photo is adjusted by utilizing clipping path, thus the inside division of that business is integrated and the break of the parts is disqualified from the concluding image. We can too use the clipping path having a special figure to a physical object, to editing a detail part within a photo or to prepare a layout pattern as the demands of our customers. AES is a true clipping path services allowing company which are regarded as to allow at the most affordable prices and superiority works within time business and at the most affordable costs. Anybody can use it because professionally or personally. Currently, graphic design, digital photographers, photo industries, and advertising agencies, web design houses, catalog companies and printing companies are for the most part to use the clipping path services.t me. It's easy. What to do with image clipping?There are various uses of clipping path in image editing industry. Bakera IT always prefers hand drawn photo clipping. Some popular forms of the uses of clipping path have been noted down below:
Back end user:In the previous section I have discussed the use of clipping path in photo editing process now I will show the real user of it. Though the user of this service can be anyone, I will mention the popular user based on our experience.
Our production house is well equipped to process your photo as per your expectation. We are available for 24/7 to provide you clipping path service at any time. Therefore, you may place an order or request for a quotation at any time. We have some specific criteria that ensure the best quality and accuracy of image clipping service:
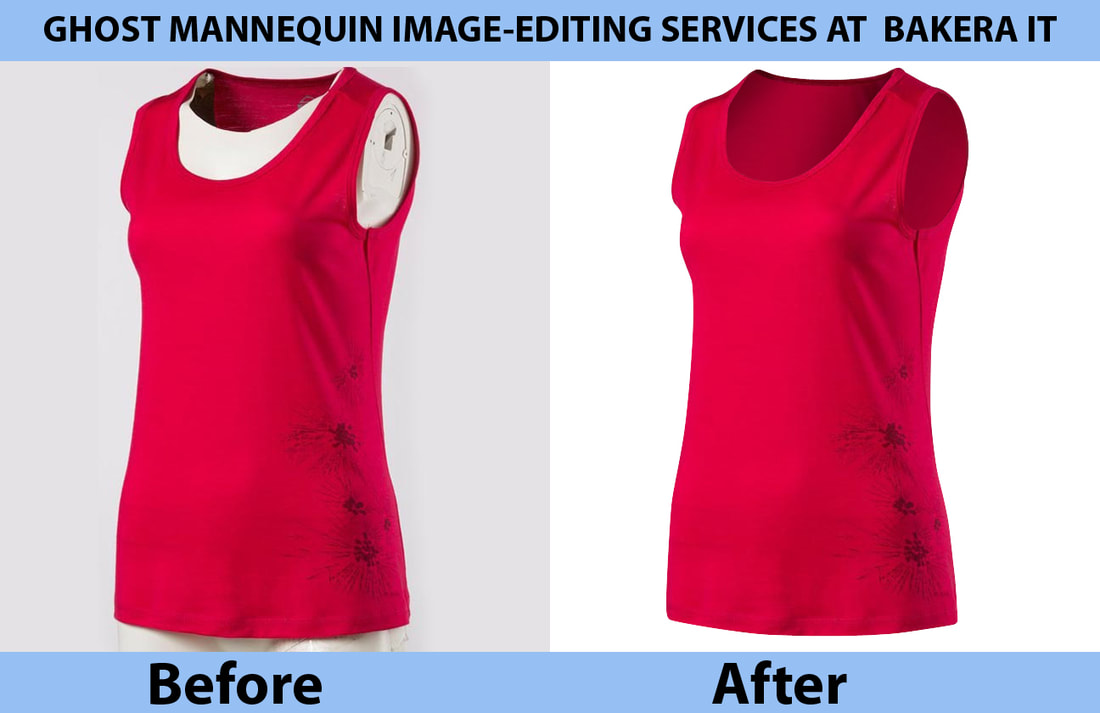 How to add a ghost mannequin to your image
To add a ghost mannequin, or invisible mannequin, to your photo, you’ll first need an image of the clothing with the mannequin, and one without the mannequin (so that the inside label is visible). Put the two images together at the neck — you can do this with a clipping path. Now you’ll have apparel that looks as though there is an invisible mannequin wearing it. Some ghost mannequins aren’t manipulated at the neck joint. Pants, watches and hats, for example, can also be edited to add natural volume and texture. Clothing and accessories that are shown on invisible mannequin look more lifelike and natural, allowing customers to see how your product is meant to be worn in real life. We combine the ghost mannequin with other services, such as color correction or shadow effect, to achieve the brightest image possible. When to use ghost mannequin
Ecommerce photography the thing is to take a photo shoot for selling the goods virtually .For this make the image of good s to more attractive to the buyer there should properly maintenance quality photo shoot also the product detailedness on the image .So here is few tips for perfect ecommerce photography . 1. Be aware about proper lighting .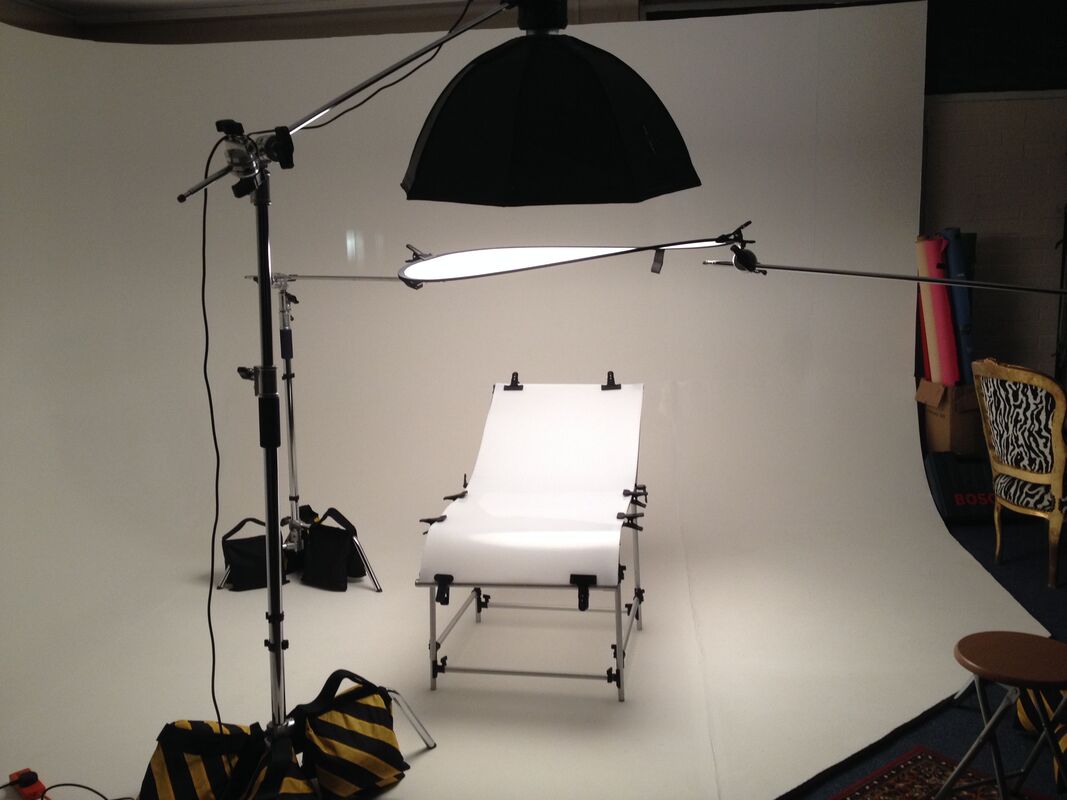 Be ensures light will properly focused the products. 2. Make sure about product background . 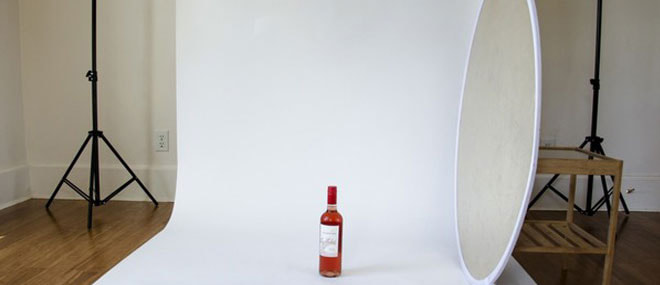 Use the likes of backgrounds which will help to highlights the products 3. On captured time should provide 100% concentrations about product details .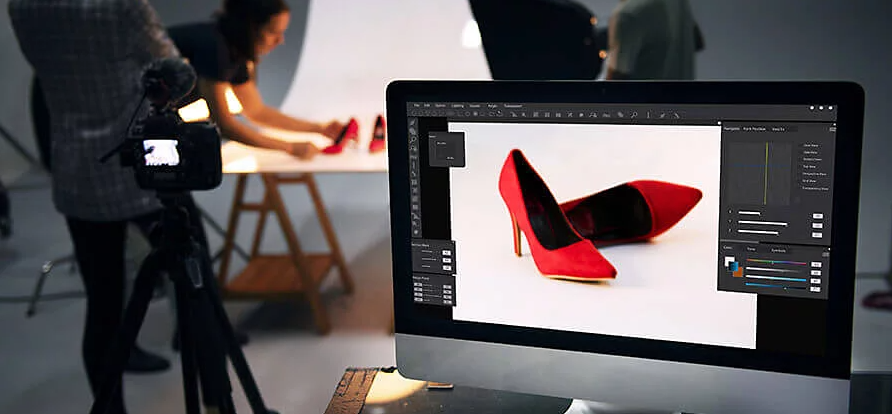 As products is main so maintaining the product details is very important otherwise buyers won’t get proper idea about products . 4. Maintenance natural view of product .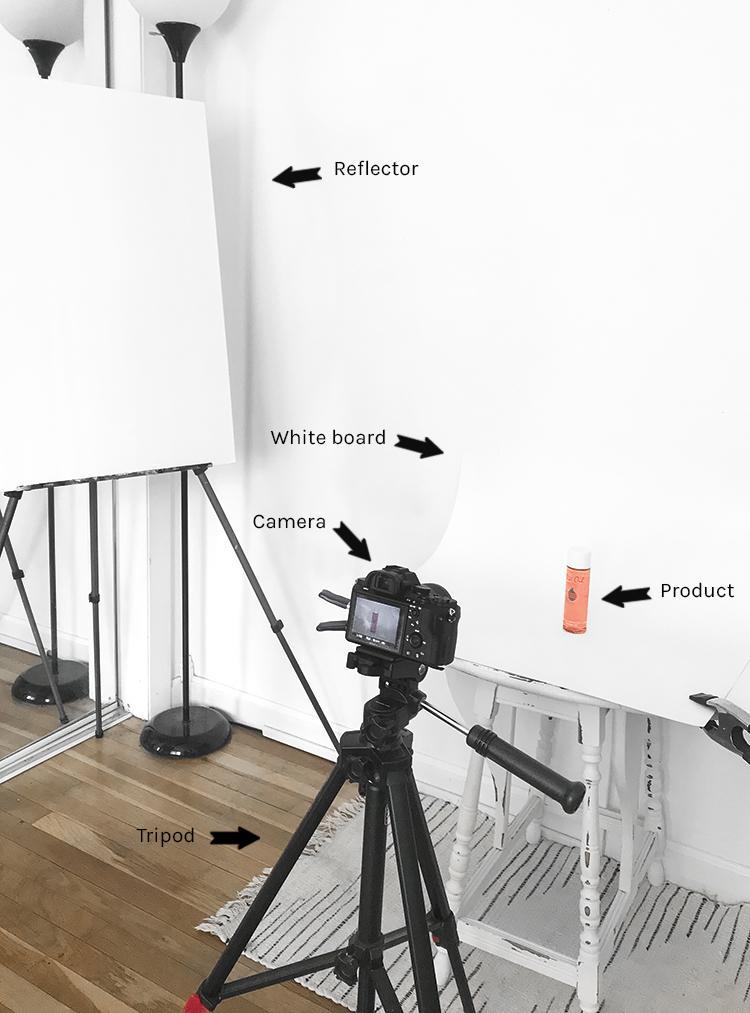 .Products naturalness is also importance ,it’s will help to touch buyers satisfaction because by this buyers will get proper idea about products 5. Consult about right camera and lens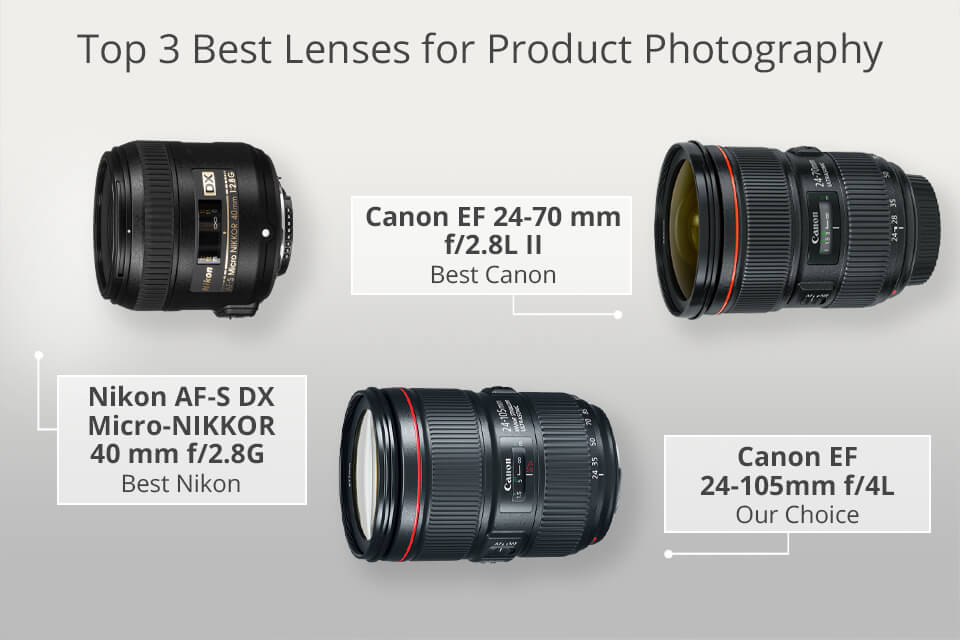 To maintenance all upper things should need an enough qualities camera and devices. 6. Don’t forget about post –processing. Before submit or use the photographs should highly check and if Photoshop’s work needs then go on this way, because needs a perfect photographs in any cost.
In this Image masking tutorial, we are presenting the universal way to do photo masking in Adobe Photoshop. Image masking is applied to correction every portion on an image in a specific colour. It is well known as changing the background, with accurate pixels without any blur. There are a few types of masking such as hair masking, fur mask, shadow mask etc. In comparison, you can apply it with different layers. This digital era, eCommerce company grabs the whole internet market. Day to day image editing services improve the eCommerce services and sells rate. There is a tremendous advantage of its professionally growing business. Photo editing is essential for eCommerce, indeed. For image editing, we are mentioned a few software and in this content, let's check out the primary tool in Photoshop.  1. How to Do Image Masking in PhotoshopPhotoshop masking technique is used to remove background especially for hair, fur, etc. There are several masking processes apply in Photoshop. Here, one of the image masking operations is discussed. We mentioned how to run Photoshop software in our clipping path tutorial, so we are escaping that part here. Open a model image that has hair where you can do masking. Go to File Menu to open. You should have a clear understanding that when we should follow Photoshop Masking technique because clipping path and image masking both applies to remove the background. We will only do Photoshop Masking when an image has hair, fur, wool, etc. while doing clipping path is not possible using Pen tool manually. Steps: Initially, we do clipping around the body and the dark hair area until the background is invisible throughout the hair part. After that make a copy of the original background layer thereby, the main image will be untouched. Select the original background image and go to Layer palette in the second right site icon and click. We created another duplicate layer. See the screenshot. 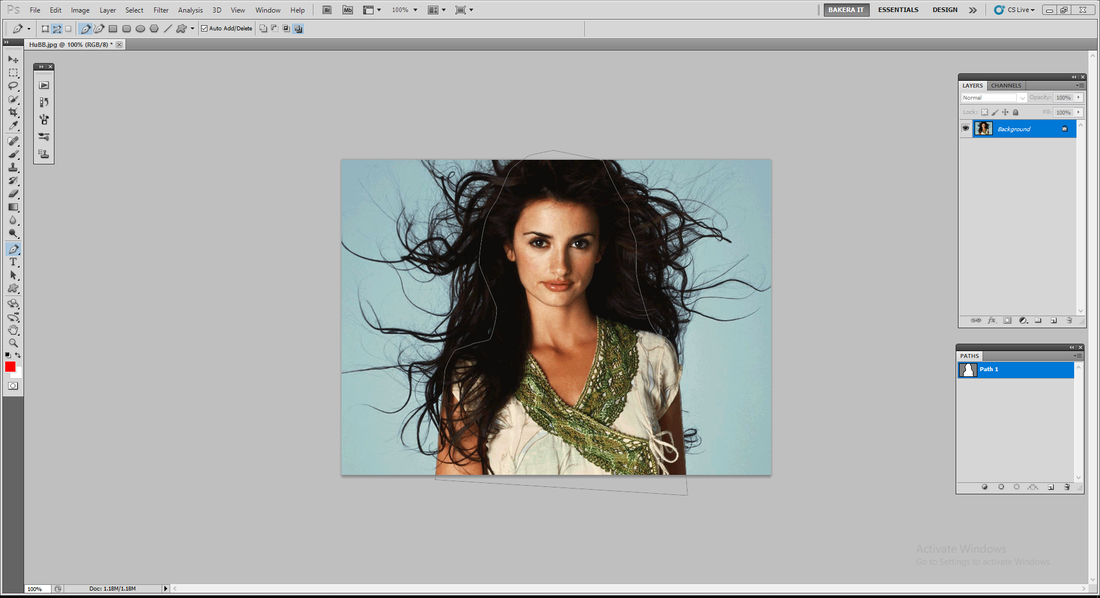 Now, select the path and inverse the selection. You will see both path area and the order are selected. You need to click on eyedropper tool, or you can select it by pressing control or Command+I on the keyboard. Choose the background area which you want to remove and then select the eraser tool in the second option of eraser palette. You need to click on the selection area and drag every corner. You have to continue erasing the background all over the background. The image will look like the screenshot background. 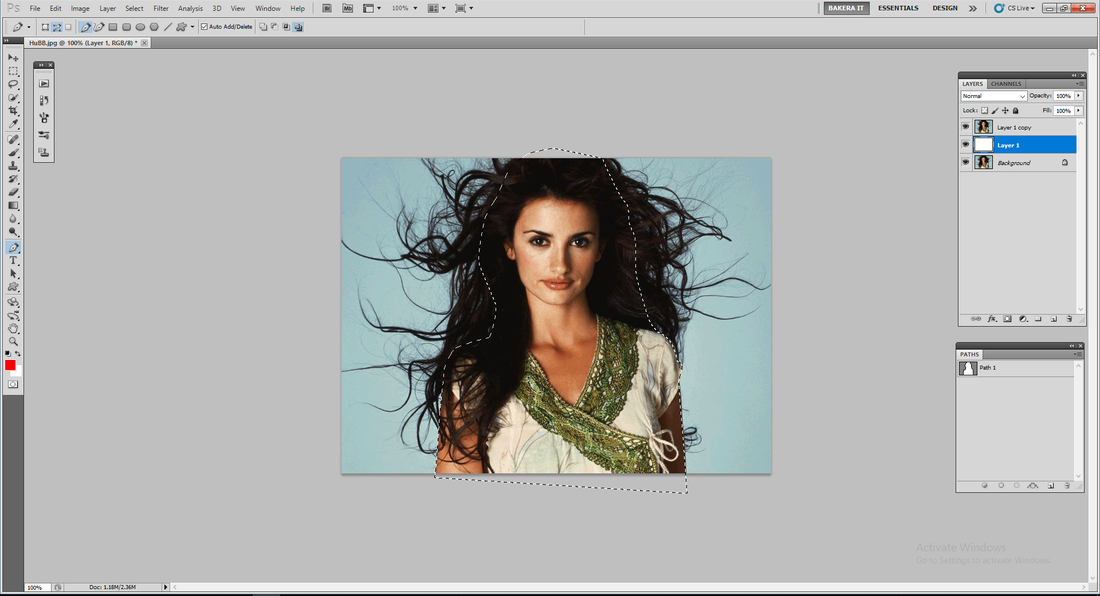 Finally, you can save the file as in transparent background for future use on a different color background. 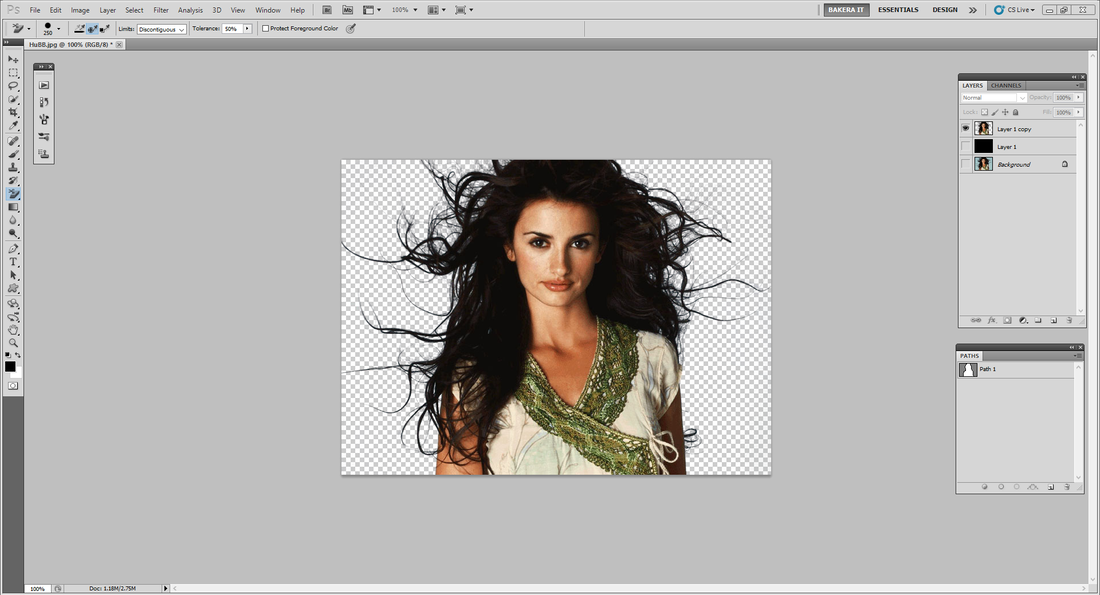 This Photoshop model masking method is a one of the masking technique we use. Recently many components of Photoshop software are using for mask out the image, but Photoshop masking is still unbeatable because It provides the best quality for model masking. If you have any question regarding our masking tutorial or other clipping mask, image retouching, image manipulation, image editing, shading, mirror effect or other Photoshop services, please feel free to Contact Us.
|
